Wall Mile 28

Wall Mile 28 [HB 210–11]

Having admired the milecastle, we can now move on, heading briefly northwards and then east to circumnavigate a small plantation. Next we cross a road and the Trail rejoins the Wall once we enter the field. We are now closer to the Military Road than the wall and ditch, but no matter. The very fact that we are walking between the 18th-century road and Hadrian’s Wall reminds us that not all of the wall was destroyed by the road being placed on top of it. Continuing into the next field we then come up against a major diversion which sends us to the north, across the line of the wall and ditch (at a point where a modern quarry has removed them) and then along the northern rim of the ditch for a while, before being sent off even further to the north-east (by a route which seems to change each time you walk it and is seldom clearly signposted) before we stumble onto the minor lane that leads us back to Walwick and the course of the Wall.

Crossing the ditch east of Milecastle 29

Crossing the ditch east of Milecastle 29

As we pass through the hamlet, we can admire the rather aggressive notices warning walkers against using the farm buildings as lavatories (and of course begging the question of why appropriate facilities have still not been provided if there is a demonstrable demand). Finally we are back at the Military Road and the line of the Wall, which we rejoin by walking a few metres downhill to the bend, placing us near the site of Milecastle 28.

Milecastle 28 (Walwick) [HB 210; haiku]

Milecastle 28 (extreme left) and Wall Mile 28

Milecastle 28 (extreme left) and Wall Mile 28

Milecastle 28 (Walwick) was a long-axis milecastle on the other side of the road, but there is, you will be unsurprised to learn, now nothing to see.

Wall Mile 29

Wall Mile 29 [HB 211–14]

Heading eastwards from the dramatic and slightly forlorn pinnacle of rock, we find that the ditch gets ever shallower, evidently having been little more than marked out, rather than fully excavated. The Trail currently passes to the south of the wall next to the trig point, then heads south until a break in the newly emerged consolidated curtain wall, where we cross the barrier again onto the berm and make our way down to the end of the field. Note that the Military Road is not on the line of the wall, here, but rather sits on the north mound of the Vallum (where it stays for nearly four Wall miles).

Ditch, berm, and curtain wall

Ditch, berm, and curtain wall

Crossing a small lane and entering the next gently sloping field, we find a splendid stretch of curtain wall and ditch at Black Carts. Two-thirds of the way down are the remains of Turret 29a.

Black Carts curtain wall and Turret 29a

Black Carts curtain wall and Turret 29a

Turret 29a (Black Carts), famously depicted in one of the woodcuts in Collingwood Bruce’s Handbook, survives to eleven courses within its recess, and has the familiar wing walls of a broad-gauge turret wed to the narrow-gauge curtain wall. It was first excavated by John Clayton in 1873 and subsequently re-examined in 1971. The threshold block in the doorway is of particular interest, since it retains the settings for the monolithic uprights that formed the door jambs, and the socket on the eastern side shows which way the door opened (remembering defensive doorways and gateways always opened inwards).

Turret 29a

Turret 29a

If you are feeling adventurous, you can nip round to the north side of the wall and hunt for a building inscription. One lies 55m from the west end (or 90m from the east) of this stretch of wall and records construction work under a centurion from the first cohort of a legion by the name of Nas(…) Ba(ssus). It has been suggested that legio XX was responsible for the initial construction of this section of wall. Bassus crops up elsewhere and an almost identical stone can be seen in Chesters museum which, although unprovenanced, may well be the pair to this stone. It has long been thought that building inscriptions were only placed on the south face of the curtain wall and that those on the north side were a result of rebuilding work. The fact that this stone is in the second course may give pause to question this argument for their placing, but it may equally hint at a very thorough rebuilding of this bit of the curtain wall (and such major reconstruction work is known elsewhere).

Centurial inscription

Centurial inscription

Leaving Black Carts behind us, we cross a lane and then head up a gently sloping field towards a plantation near the top, the ditch still visible to our left, but the curtain wall now hidden. Near the top of the field is the site of Milecastle 29.

Milecastle 29 (Tower Tye) [HB 211; haiku]

Milecastle 29 from the air

Milecastle 29 from the air

Milecastle 29 (Tower Tye), like Milecastle 38 (remember those bankers?), exists now solely as an earthwork, but is nevertheless an extremely interesting example. Excavated by John Clayton, the robber trenches for its walls are still sharply defined. However, there is an additional detail that the keen-of-eye may be able to make out and that is the fact that the milecastle is one of the few known to have had a ditch around it. It shows up now as a shallow depression around the west, south, and east sides.

Seditio3ad

Wall Mile 30

Wall Mile 30 [HB 214–15]

Departing Carrawburgh, we head eastwards up the field, past some recent quarrying next to the Military Road, and before long the Vallum re-emerges, now with the Military Way perched on its north mound. We now have to negotiate another crossing of the Military Road (so, once again, take care as there are maniacs in cars along here), backtracking slightly to get into the far field and resume the Trail to the north of the ditch. Before heading on, look back towards Carrawburgh and you will see a view that has changed little from when J. P. Gibson took a photograph of it before the First World War, although his model was then able to sit down in the road (which did not have a tarmac surface and was much lower than the current ‘blacktop’).

The Military Road at Carrawburgh before tarmac and cars

The Military Road at Carrawburgh before tarmac and cars

We plod on to the north of the ditch, now being a good time to admire those roadside drystone walls (they are easier to see from either side than from the road, due to the changes in level since the road was built). The larger blocks, curiously familiar from our perambulations next to the curtain wall, are interrupted by regular lines of throughstones. This pattern of construction becomes obvious when poor quality repairs are attempted in places, although this stretch is in good order.

The construction of the Military Road began in 1749 with a survey from west to east, undertaken by military engineers Dugal Campbell and Hugh Debbeig (the latter serving later at Wolfe’s side at Quebec), the actual work of building the road and walls being contracted out to civilian companies (unlike the other military roads in the Highlands, which the Hannoverian army built).

Ditch at Limestone Corner

Ditch at Limestone Corner

Finally, we cross a stile and reach one of the great enigmas of Hadrian’s Wall: Limestone Corner. Why an enigma? Well, there’s no limestone there for starters; it starts further to the east – no matter. More perplexingly, this is the point at which the Roman army got fed up digging their ditch and gave up. It is perplexing as the vallum diggers had no such problems and ploughed through the whin stone along here regardless, so it seems the ditch-diggers may have had a bad Friday afternoon. The most exciting thing about Limestone Corner is that the course of the ditch (and curtain wall) moves offline in order to stay at the top of the scarp, thereby (once again) enhancing the defensive effect of the ditch (although not quite as much as if they had actually finished it, of course). To the south of us, large chunks of whin have been discarded down the slope, the largest of which (subsequently split into two) has been estimated as weighing around twelve tonnes (naturally, there is no record of anybody having actually weighed it; this is a guesstimate). Such pieces probably had to be removed with sheer legs, a technology with which the Roman army were not unfamiliar.

Wedge marks in rock

Wedge marks in rock

If we move a little further on from the point where the Trail crosses the ditch, we can stop by a large rock protruding from the base of the ditch. Wedge holes can still be seen in the top of it where the attempts to split it were given up; it must have been a bad day.

Milecastle 30 (Limestone Corner) [HB 214–15; haiku]

Milecastle 30 (Limestone Corner) survives as an earthwork to the south of the field wall (which is set back slightly from the line of the curtain wall), excavation showing that the narrow wall butted against broad wing walls.

Milecastle 30 and the Limestone Corner ditch debris

Milecastle 30 and the Limestone Corner ditch debris

Wall Mile 31

Wall Mile 31 [HB 215 and 224]

Our gentle climb continues until we reach Carraw Farm, where we are diverted off to the north (this bit can get a bit plodgy) and then back round and onto the upcast mound again, north of the ditch. Now, however, since we have passed the crest, Carrawburgh fort heaves into view south of the road, after we have negotiated the dip. You will have noted that, now that the Wall has come down from the crags, it is being extremely well-behaved and traversing the landscape with nice straight stretches, just like the Vallum has been doing all along. Now there is nothing to stop the two of them running along, hand-in-hand, for a few miles.

Carrawburgh from near Carraw Farm

Carrawburgh from near Carraw Farm

Our second crossing of the Military Road is about to occur, but here there is no pedestrian crossing as there was in Stanwix so keep a sharp lookout as they drive fast around these parts and the crossing is at the bottom of the dip.

Site of Coventina's Well

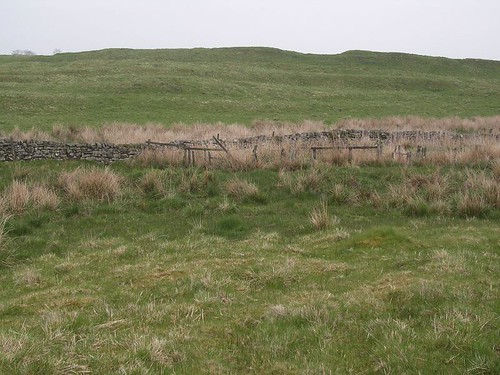
Site of Coventina’s Well

Once over the road, there is an extremely boggy portion off to the right of the path (between us and the imposing ramparts of the fort) and the section with a pond in the middle of it is in fact the site of the shrine of Coventina, a local water nymph. When it was excavated in 1876, it produced vast amounts of coins (more than 13,000; some were melted down and cast into a bronze eagle – must have seemed like a good idea at the time) as well as other votive material, some of which we can see in Chesters museum very soon, and is characteristic of the Celto-Roman veneration of water deities.

Carrawburgh fort (BROCOLITIA) [HB 216–23]

Carrawburgh fort (BROCOLITIA) (pronounced Carra-Bruff) is 7.6km (4.75 miles) from Housesteads and is one of the forts that sits astride the Wall, rather than attached to the rear or even detached. Occupying 1.6ha (3.9 acres), it was constructed after the Vallum, the course of which runs under it. It was garrisoned by the cohors I Aquitanorum in the 2nd century and other units attested include the cohortes I Cugernorum, I Frixiavonum, and I Tungrorum (the last of which, as we know from Housesteads, was milliary, so only a detachment would have fitted in). Cohors I Batavorum was recorded in the 3rd and 4th centuries.

Mithraeum

Mithraeum

There is little to see of the fort, although its platform is still prominent, but the mithraeum outwith the fort in the civil settlement is on display. When excavated, the waterlogged conditions preserved many organic remains that enabled a detailed reconstruction to be built in the former Museum of Antiquities, now recreated as a rather-less-successful video display in the Great North Museum, both in Newcastle. On site, the organic components have been cast in concrete, which is also the medium employed for the replica statuary and altars.

Designed to mimic a cave and produce what excitable marketing types would probably call ‘an immersive experience’ these days, devotees entered at the south end of this small quasi-apsidal building, encountering a diminutive lobby or vestibule, separated from the rest of the interior by a wooden screen. Beyond the screen were two wicker-lined benches, one on either side, attended by Mithras’ familiar torch-bearing companions Cautes and Cautopates (the former with his torch held upwards, the latter downwards). Cautes has lost his head, but of poor old Cautopates, only the feet remain. At the northern end, there are three altars, dedicated by commanders of the cohors I Batavorum. The one on the left incorporates a nice little effect, whereby the radiate crown of Mithras has been pierced, enabling a lamp to be placed behind it for some minimalistic visual trickery. Evidence of what went on in here includes burnt pine cones, a chicken’s head, and bones from pork, lamb, and more chickens: obviously somebody’s idea of a fun night out in the vicus. The whole thing was thoroughly trashed in the 4th century AD and it is speculated that Christians may have been responsible.
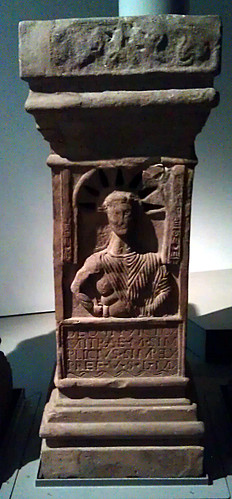
Altar for Mithras

Altar for Mithras

Mithraism was an elitist cult (the temple could only accommodate twelve so it was obviously not meant for the common soldiery), with a strict hierarchy that mimicked the army’s rank structure, and a series of ordeals beloved of such institutions

Immediately outside the entrance at the western end of the mithraeum was another small shrine, dedicated to the nymphs (unsurprising, given the presence of so much water in the vicinity) and the genius loci (literally ‘spirit of the place’).

As we have already seen, the remains of Coventina’s shrine lie nearby, but there was also a bath-house on this side of the fort, excavated by Clayton but not now visible… well, in fact, to be brutally honest, it is currently ‘lost’.

Milecastle 31 (Carrawburgh) [HB 215; haiku]

Looking towards the site of Milecastle 31

Looking towards the site of Milecastle 31

Milecastle 31 (Carrawburgh) lay just beyond the eastern end of the car park, part of one of the robbed walls having been found. Needless to say, there is nothing to be seen now.

PLVad2

Wall Mile 32

Wall Mile 32 [HB 224–5]

As we depart Milecastle 33, we are still on the approximate line of the curtain wall, but shortly we cross over the ditch and find ourselves firmly in Barbaricum for a while. This occurs at the point where the Military Road shuffles in and adopts a position on top of the curtain wall which it will retain, for the most part, until we reach the outskirts of Newcastle. Now we are walking along the line of the upcast mound and there is a little to see, beyond the ditch, hard up against the north wall of the Military Road.

The Trail crosses the ditch

The Trail crosses the ditch

These walls are interesting (as indeed is the Military Road, about which we shall say more in due course). Before the road was built, Hadrian’s Wall itself was the major land division, so destroying it and laying a road required that walls be built on either side of it, to placate the landowners. Therefore, the road-laying gangs also had to undertake wall construction, and there are still some fine examples of the drystone-wallers’ art to be seen as we progress towards our destination.

Looking towards Carraw Farm

Looking towards Carraw Farm

Milecastle 32 (Carraw) [HB 224; haiku]

After an interminable distance (or so it seems) we cross a drystone wall by means of a ladder stile and then it is only some 220m to the location of Milecastle 32 (Carraw). Don’t bother looking for it, as it is on the other side of the road (remember: the Military Road sits on top of the curtain wall, now, so the milecastle is south of that), but it survives as a low earthwork, was of the long-axis type, and was excavated in 1971.

The site of Milecastle 32 from the air

The site of Milecastle 32 from the air

Wall Mile 33

Wall Mile 33 [HB 225–6]

The landscape now takes on a more gentle aspect for the walker. We are also soon going to encounter the Military Road again after a long interval and it will be a close companion until we reach Newcastle. Meanwhile, the remains of the curtain wall are visible as a low mound with occasional blocks of stone poking out. Treat it gently and tread carefully. It continues like this until we reach the remains of Turret 33b (Coesike).

Ditch at Milecastle 34 and Wall Mile 33

Ditch at Milecastle 34 and Wall Mile 33

Another of the short-lived turrets, with broad gauge footings cut away by the narrow gauge wall. Once again, the recess-filling wall is present, albeit not of the best quality workmanship, probably to enable a wall walk to cross it safely. The doorway still retains its blocking, so the turret was evidently not completely reduced upon abandonment.

Turret 34b

Turret 34b

To the south of us, the Military Road emerges from a softwood plantation to swoop across the Vallum and now keep pace with us, although still not actually on the curtain wall. We cross from walking behind the wall to walking along the berm and a field wall now sits just to the south of the curtain wall’s remains, beginning a gentle climb up towards Carraw Farm.

The Military Road crossing the Vallum

The Military Road crossing the Vallum

We proceed in this fashion until we come to Milecastle 33 (Shield-on-the-Wall), the side walls of which we have to cross, as the curtain wall is to our left and the field wall to our right.

Milecastle 33 (Shield-on-the-Wall) [HB 225; haiku]

Looking towards Milecastle 33

Looking towards Milecastle 33

The north gate and parts of the side walls of this long-axis milecastle are still exposed, perhaps a bit too much for those who worry about potential damage to the monument. One interesting detail to note is how excavation has changed its flora and made it stand out. Excavated in 1935–6, it usually shows as a patch of bracken, with an old spoil heap standing proud at its south-east corner (it is not generally thought good practice for archaeologists to leave their spoil heaps lying around, but it sometimes happens).

The north gate of Milecastle 33

The north gate of Milecastle 33

CGHad

Wall Mile 34

Wall Mile 34 [HB 227–8]

About 50m east of Milecastle 35, there is a small stone box next to the south face of the curtain wall. This is the remains of a cist burial, presumed to date to the post-Roman period. The curtain wall along here is very obviously narrow gauge on broad foundations (some of which were of whin) and, noting a narrow cleft which William Hutton was told was a tunnel dug by adventurous Picts in order to sneak under the curtain wall, we follow it until we reach the plantation around Sewing Shields farm. Emerging on the far side, it is now clear that we are nearing the end of the crags. We have another turret to inspect before we get too carried away, Turret 34a (the site of 34b was in the plantation).

The curtain wall and cist

The curtain wall and cist

Turret 34a (Grindon West) was furnished with exceedingly small wing walls and this was another of those turrets which was only occupied in the 2nd century and, after abandonment, had its northern recess filled in. In the doorway, the curious will note the settings for the stone jambs of the door as well as the socket for the door pivot on the east side.

Turret 34a

Turret 34a

To our north are the earthworks that are all that remains of Sewingshields Castle, still visible from the air, but our principal concern is the proximity of the next milecastle, marked by a walled plantation on top of it. As we reach it, we note that the ditch has rejoined us to the north, since the crags are now behind us and a man-made obstacle is once more needed.

Milecastle 34 (Grindon) [HB 227; haiku]

Site of Milecastle 34

Site of Milecastle 34

Although the position of Milecastle 34 (Grindon) is conveniently marked by the plantation, there is nothing to see of the milecastle itself, beyond an information panel, but it makes a fine observation point from which to observe the ditch in either direction.