Wall Mile 48 [HB 285–91]
Wall Mile 48 is one of the finest on the whole Wall for understanding the basics of the system, both ‘as designed’ and ‘as built’. This is not only because it is mostly intact, but also because it has both flanking milecastles surviving (Milecastles 49 and 48) and both intervening turrets (Turrets 48b and a), as well as substantial lengths of ditch in various states of preservation.
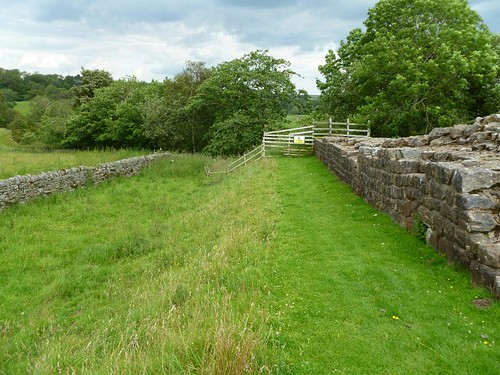
The Wall and ditch just above the Irthing Gorge
Before continuing along the Trail and down the track, we can take the time to examine the short stretch of wall and ditch between the milecastle and the gorge. Originally more survived, but the river has eaten into the hillside over the years removing all trace of how Hadrian’s Wall originally negotiated the west bank of the river. Large amounts of the spoil excavated from Birdoswald were dumped down here, only to be carried away again by landslips. Looking back towards the west, the original line of the Turf Wall was that followed by the Stone Wall in this sector and the Irthing gorge was the easternmost extent of that rampart.
The curtain wall (and the Military Way) crossed the river by means of a bridge, the remains of which we shall inspect in a short while. First, the Trail wends its way down the hillside to the floodplain of the Irthing, which it crosses by means of the (intentionally rusty) Millennium Bridge. Follow the path along, through the kissing gate, and only then does it bring you to the eastern abutment of the Roman bridge at Willowford.
Willowford Bridge abutment
Confronted by the bridge abutment at the end of a long section of Wall descending into the floodplain of the Irthing, one can be forgiven for being slightly nonplussed. The river is some distance to the west and has probably destroyed the western abutment. The bridge piers would have lain beneath the field between the river and the surviving abutment, whilst the abutment as it survives reveals several distinct phases to its existence.

The bridge abutment, with the later masonry to the left
If we start on the southern side of the abutment, the sequence is clearer. Easternmost was a simple abutment, angled back from the end of the curtain wall (which was broad gauge for a short distance and had a turret near the end), and now embedded within later masonry that was added to repair the abutment after damage (probably from flooding), also providing mill races for one or more undershot water mills. One of these races preserves two large, shallow, square sockets in its upper surface that would have taken timber uprights for one of the bridges crossing here. The basic rule here, then, is the nearer to the river, the later it is. Indeed, excavation has shown that the bridge went through several phases, starting with a simple pedestrian crossing, presumably fortified in a similar manner to the curtain wall on either side of it (although we cannot even take that for granted). It was then enlarged to allow the Military Way to cross, so had to be big enough to carry vehicles.

The later tower and repairs to the curtain wall
A new (larger) tower was also added, slightly to the east of the original one, and we may suppose that it was matched by a twin on the other lost abutment. The later phases reused earlier stone – one piece of opus quadratum (large, heavy stones that were usually jointed using iron or lead cramps, rather than mortared into position) on the southern edge has cramp holes set into it that imply it was originally joined to another stone, but now finds itself as an edge piece. If we walk round to the northern side we can see just how rough some of the later stonework was in places. The re-use of Hadrian’s Wall began early: to repair the Wall itself.
One niggling thought intrudes at this point, as we envisage this massive bridge structure majestically crossing the river. What was to stop intruders sneaking under the bridge? The answer is, depressingly, we don’t know. That there was some system in place seems beyond doubt, but no hint of a suggestion of an indication of an answer is known as yet. Sometimes archaeology is like that.

The curtain wall running to Willowford bridge abutent
Continuing on the northern side of the curtain wall, you are next to a stretch of narrow gauge wall (about 2.3m) on broad foundations and, for the first time, we have left the territory of the Turf Wall, since Milecastle 49 was its easternmost extremity. We can take a few moments to examine the fabric of the curtain wall and observe how the blocks are fashioned (roughly squared at the face, tapering in to towards the core) and how the whole thing sits upon a footing which protrudes slightly at ground level. This is a barbarian’s eye view of the Wall and it is difficult not to be impressed. We may also note how rounded river cobbles have been incorporated in the core. The keen-eyed might even notice lime staining on the northern face of the wall, leached out from the lime mortar used to point it. This whole stretch is an example of the ‘as found’ consolidation style used in more recent years, with none of the reconstruction we shall see later in the Central Sector.

Willowford centurial inscription
As the curtain wall ascends the river terrace, note how the coursing is kept level whilst the footings tend to follow the contours. Once we reach the top, the wall itself is briefly interrupted by the farmyard entrance but there is a centurial inscription (RIB 3407) built into the corner of an outbuilding. It was found nearby in 1986 and has been incorporated above a convenient plaque recording its contents.
Turret 48b (Willowford West)

Turret 48b
Now, the path (by means of a rather elaborate timber edifice, designed to stop visitors walking on – and damaging – the remains of the curtain wall itself) delivers you to Turret 48b, which was excavated in 1923. Standing up to nine courses high, the turret has lost its south wall, but still gives a good impression of the limited space available within its ground floor. Before we move on, inspect the curtain wall immediately east of the structure. Note that the rear face is stepped (there is a foundation course, four courses of a plinth, then the main curtain wall) and that it soon changes, becoming abruptly narrower. The reasons will become more readily apparent once we reach Turret 48a (thus providing an incentive to be moving on).

The Trail to the south of the curtain wall and the track in the ditch
As we follow the Trail immediately south of the curtain wall (and yes, you are not wrong, it is a bit cramped, especially if we encounter walkers coming the other way: footpath people call this a ‘pinch-point’), we can look to the right at the farm track, which is at this point within the Wall ditch. We shall see roads and tracks using the ditch again before our journey is complete. The curtain Wall itself is now sitting on a broad foundation and parts of the footings of the broader wall had clearly begun construction when the decision was made to narrow it. Soon the farm track crosses the line of the curtain wall to continue behind it and the curtain wall runs along the edge of the Irthing gorge.

Short length of curtain wall next to the track
As we join the track, we can still see the ditch off to our left, beyond the drystone wall. Before very long we find a short length of the curtain wall. Walking around to its northern side reveals just how much of it survives and shows off the offset footing courses rather nicely. Both the ditch and part of the curtain wall have been destroyed by the ingress of river bank erosion for a short distance, but we soon encounter another stretch of the wall leading up to Turret 48a.
Turret 48a (Willowford East)

Turret 48a
Turret 48a, also excavated in 1923, similarly survives up to seven courses in height and we may observe that its entrance is on the western side of the southern wall. Since this turret is easier to understand than 48b, unencumbered as it is by fences and destroyed walls, it is time for a bit of wall width exposition.
What is interesting about this turret from our point of view is that it betrays something of the way in which the curtain wall was constructed. We noted the wall at Willowford abutment was built to what is known as the broad gauge (10Rft or 2.74–2.97m) and immediately to the east reduced in width, whilst still on broad foundations. Turret 48a is also constructed to that same broad gauge, as are short lengths of curtain wall on either side (known as ‘wing walls’), but then the width of the curtain is similarly reduced to only 8Rft, sitting on a broad foundation. We can conclude from this that a) the foundations of the stone wall were built separately to the superstructure; b) Turrets 48b and a (and probably the abutment) were started independently of the curtain wall on either side; and c) somebody had changed their mind about how wide the curtain wall needed to be to do its job and that they had done this after the foundations, some of the superstructure, and some of the features (in this case the turret and abutment) had already been constructed.

The old vicarage and its length of wall
When we reach the end of this section, we must cross the road and look for the Trail path to the right of the school. The final section of curtain wall in this mile actually lies to the left of the school but, although it is in Guardianship (or ‘in care’ as they like to say these days, making it sound more than a little delinquent). It is on private land next to the dilapidated (but allegedly still occupied) old vicarage where Hunter Davies stayed when he walked the Wall and cannot, unfortunately, be visited. It can however be seen at a distance as you climb towards the railway crossing, as can the depression of the ditch to the north of it, and it is apparent how the railway embankment passes over the Wall and effectively masks the original lie of the land (the curtain wall climbs abruptly beneath that embankment). Once the path reaches it, take care crossing the railway line.
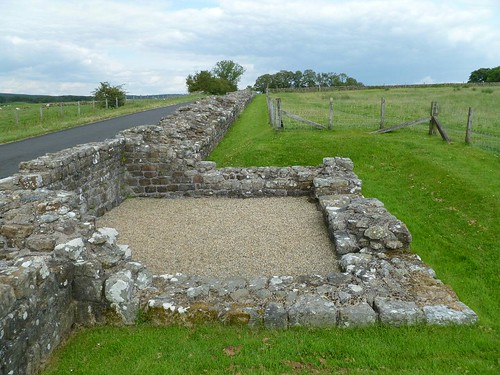
Milecastle 48 (Poltross Burn) [HB 285–7; haiku]

Milecastle 48
With the appetite whetted by Milecastle 49 and Turrets 48b and 48a, there is now the opportunity to examine Milecastle 48, one of the best preserved along the line of the Wall. First excavated in 1886, and then subsequently in 1909 and 1911 (and again in 1965 and 1966), it is perched rather precariously behind and sloping down towards the curtain wall. Its own perimeter wall joins the curtain perpendicularly (and is bonded to it), but its southern corners are rounded as Roman fortifications of the 2nd century AD usually were. On the eastern side (and on the western, but no longer visible) is a short wing wall similar to those on Turrets 48a and 48b, confirming that the milecastle had been built to the broad gauge before the (now narrow) curtain wall reached it. Here it differs radically from its later neighbour, Milecastle 49, which, as we have seen, was built after the curtain wall.
There are two internal structures, aligned on either side of the roadway that passes between the gates, the northernmost of which, rather excitingly, led out into Barbaricum (these days represented by the side of the embankment of the Newcastle to Carlisle railway). The north gate is well preserved and is of a type (III, if you must know) that scholars have suggested mean it was constructed by legio VI Victrix. The gate was subsequently narrowed to only allow pedestrian access, as happened at other milecastles.
Within the milecastle, a north–south road way ran between the north and south gates and on either side of it were structures thought to be barrack buildings. The slope is rather extreme and the floors were probably levelled up on joists inside. It is thought that the milecastle garrisons were outposted from neighbouring forts, in order to provide the manpower to patrol the Wall and man the turrets. ‘Thought’ because, in the absence of direct evidence from Hadrian’s Wall itself, we have to use comparisons with other provinces, where we know outposting was practised widely.

Remains of the oven
In the north-east corner are the remains of the oven used for cooking (the Roman army preferred to keep their celebrity chefs at arm’s length), so it is in the equivalent position to ovens in larger forts and fortresses. Roman ovens worked like a traditional pizza oven: the fabric is heated by inserting hot embers which are then raked out and the food to be cooked (mostly bread) placed inside. Carbonised Roman bread (as well as wall paintings of the uncarbonised original) is known from Pompeii, but as yet no pizza.

The steps
Milecastle 48 also provides another important fact that sheds some (but not quite enough) light upon our understanding of the Wall. This is the survival of a staircase in its north-east corner. Only the lowest three (and part of a fourth) steps actually survive, but by projecting their line upwards, it is possible to deduce that the wall-walk height here must have been in the region of 12 Rft (3.55m). The astute observer will note that the stairs were constructed after the north and east walls of the milecastle, since it butts against and is not bonded with them (the coursing of the facing stones is different).

The eastern ‘wing wall’ of Milecastle 48
This then leads on to the question of whether the curtain wall had a walkway along the whole length of its top, or just in select places, such as round the perimeter of the milecastle defences. Scholars can be found who favour either; the evidence is suitably and intriguingly ambivalent; but, in the end, it all comes down to a matter of personal preference. Those brought up on a diet of Alan Sorrell illustrations, with a crenellated Wall striding across the crags, wind-blown Roman soldiers atop it warily eyeing distant squalls, find it hard to escape the image, even though we know other contemporary frontiers (notably those in Germany) had no such feature and modern military walls (like the Berlin Wall or the coyly named Security Fence around the West Bank in Palestine) get by quite happily without being patrolled from the top. No certainties there, then, but there are many who would argue that the Wall only makes sense with a walkway.


You must be logged in to post a comment.